
This document provides a brief tutorial for using Mac OS X 10.2’s (Jaguar’s) new Audio MIDI Setup utility application to troubleshoot and customize your MIDI setup.
Note: MIDI applications will work properly with any devices whose drivers are properly installed and which have not been “grabbed” by the Classic environment. Unlike OMS on Mac OS 9, it is not necessary to do anything in AMS before using your MIDI hardware. That said, AMS is a useful tool for diagnosing setup problems and for customization.
Audio MIDI Setup (AMS) is in the Utilities folder inside the Applications folder. Open it and click on the MIDI Devices tab. You should see a window like this:
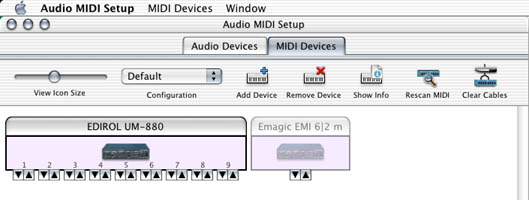
If your MIDI interface does not appear, make sure it is powered on and connected to your computer. If you are running any Classic applications and your USB interface did not appear, quit AMS and all MIDI and Classic applications, shut down the Classic environment (you can do this in the System Preferences). If you did not install Mac OS X drivers for your hardware, you may need to do so.
If your MIDI interface is grayed out, like the Emagic EMI 6|2 M in the illustration, that means that this interface was previously present when you ran a MIDI application, but the driver could not locate it, or the driver is no longer installed. If the device is present, quit AMS and all MIDI and Classic applications, shut down the Classic environment, and make sure that drivers for your hardware are installed. If you no longer have this hardware, you can select and delete the interface if you like.
If your MIDI interface appears and is not grayed out, like the Edirol UM-880 in the illustration, this means that your device’s driver has successfully located the hardware and all is well. If you like, you can begin using your MIDI applications without any further setup. In your applications, you will see the names of the hardware ports, as assigned by the driver. In the case of the UM-880, for example, you will see “Port 1,” “Port 2,” etc.
If Audio MIDI Setup crashes when starting or when you click on MIDI Devices, this is probably because the MIDIServer process has crashed while starting, most likely due to a problematic MIDI driver. Try moving aside 3rd party MIDI drivers. Drivers are normally installed in /Library/Audio/MIDI Drivers, though they may also be loaded from \$(HOME)/Library/Audio/MIDI Drivers and /System/Library/Extensions. You might find useful clues as to which driver is crashing in: \$(HOME)/Library/Logs/CrashReporter/MIDIServer.crash.log (scroll to the bottom for the most recent crash).
Customizing your setup is optional, not required. By providing more information about your MIDI devices:
The Add Device button will let you add external MIDI devices to your setup, devices which are connected to a MIDI interface (as opposed to directly to the computer). After adding an external device, drag between the small port arrows on the interface and the device to indicate the presence of a MIDI cable. Double-click the device to open a dialog where you can customize the device’s name and icon, as well as enter other information about it.
Unless your application’s documentation tells you otherwise, it’s not necessary to describe its properties in the information dialog, though some applications may use this information in helpful ways.
The manufacturer and model names may be informative to applications, such as editor/librarians, which have behavior specific to certain devices. The SysEx ID may also be used by editor/librarians.
By specifying that a device only transmits or receives on certain MIDI channels, and doesn’t support MIDI events like (beat) clock and MIDI Time Code, in a large setup, an application can present you with more concise and appropriate choices of devices. For example, if you specify that a device only receives on channels 1-8, an application might be able to shorten a menu containing all the devices and channels in your studio.
You can choose new icons for your devices by clicking on the existing one in the dialog.
If you wish to add your own collection of custom icons for your devices, create a folder in /Library/Audio/MIDI Devices (or in the same place in your home folder), named whatever you like, for example, My Devices, then create another folder named Images within My Devices. Then put your images there (I believe the maximum size is 128 x 128). Now, when you click on a device’s icon in its property sheet, you’ll see My Devices in the Icon Set menu, and when you choose My Devices, you’ll then be able to select one of your custom icons.
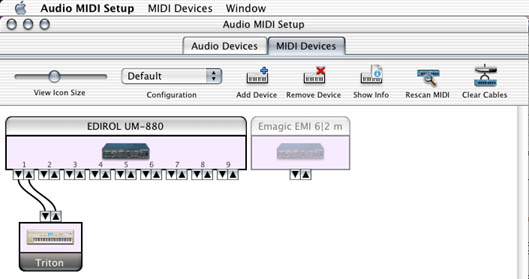
Now you’ve told Core MIDI that you have a device named “Triton” connected to Port 1 of the UM-880. Some applications may now display “Triton” in place of “Port 1.” Others will require updates in order to do this.
Note: The cable connections you draw here are simply providing information to MIDI applications about what devices are present and how they are connected; they are not creating software MIDI routings.
Further customization is possible, but that’s beyond the scope of this basic tutorial.
This page is provided as a public resource and has no affiliation with, or endorsement by, the site owner’s employer. (dsw, 2002)